On Display

The Fibre Arts Festival and Sale 2024 - Peterborough was held on Saturday, April 13, 2024, at the Peterborough Sport and Wellness Centre. Please see here for more information about our Guild's participation in this successful event: Fibre Arts Festival and Sale 2024

Embroidered Boxes

Thank you very much to Norah for leading us through an exercise in how to make embroidered boxes.  Norah’s instructions along with other information can only be accessed through the Members Only Page.

Although some of the members have experience in making these boxes, there are several of our members who have limited, or non-existent, experience.  Below are pictures of completed boxes, along with stories from the creators, as a result of this Workshop.

Cynthia – My first finished box. Not much detail with beads, buttons or fancy stitches. I didn’t want to be overwhelmed. I trudged ahead to have it completed as a Christmas gift for our daughter.

I had the crazy patch made sometime ago which I used for the lid. The Japanese fabric for the inner and outer box I had in my stash. I embellished the fabric with minimal stitching as it was pretty to stand alone. I used such tiny whip stitches to piece the sides together  it took forever!

The outer corners I used a couching stitch as I didn’t know how else to fill in the narrow gap. The button I got in a gift shop in PEI and it is looped with stretchy face mask elastic!

Thanks Nora and all who provided incentive to complete this project.

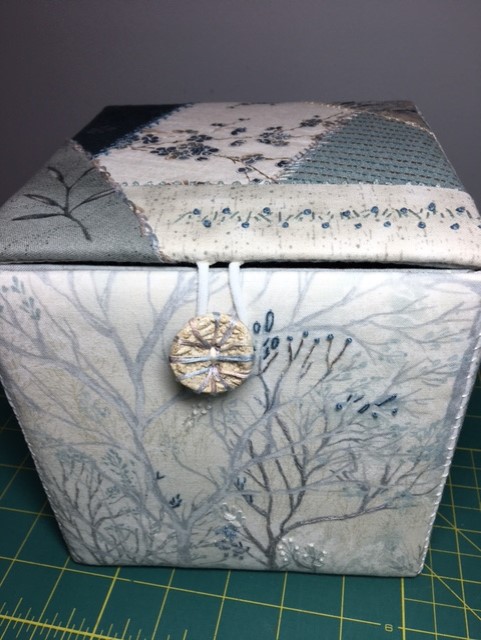
Jan –  My box is a hybrid memory box of the pandemic.  I started with the idea of piecing together the base fabric, as we are piecing together altered lives in these times of restrictions.  I added a bit of crazy quilting along the seams to represent how hard we are all working to make sense of these challenging times, using primarily cretan, herringbone, chevron and feather stitches.

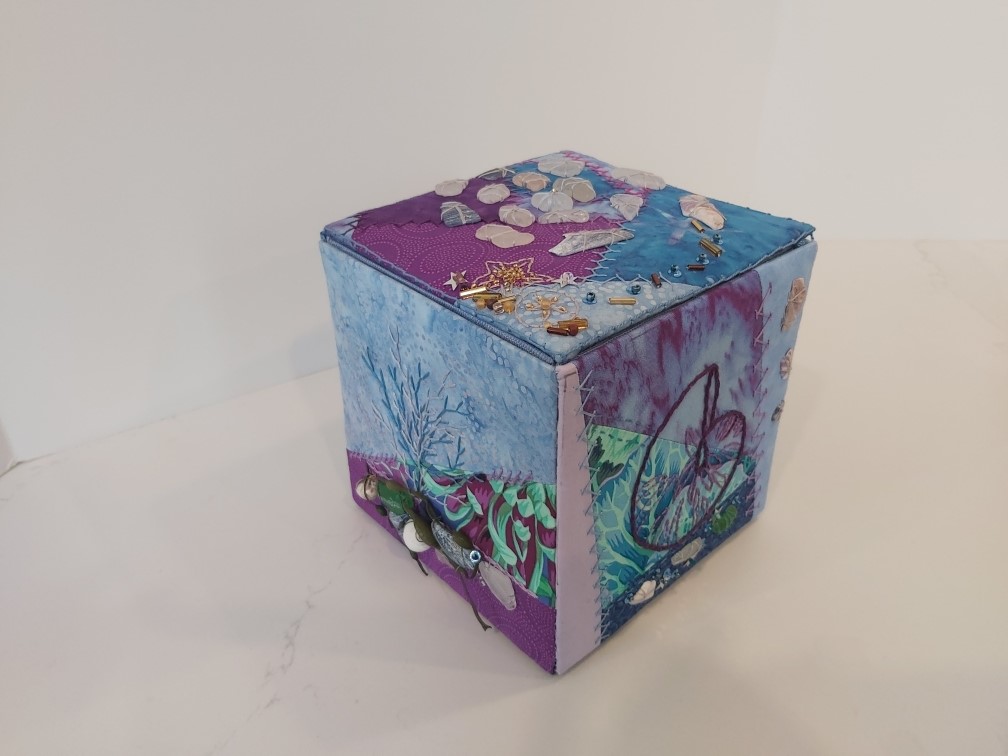
Then I switched environments to the Nova Scotia shores near Halifax, for a 2 week quarantine with my daughter who attends school there.  We travelled to NS, directly to our quarantine AirBnB along the shore, and enjoyed the gorgeous views of sea and sky.  We were able to go outdoors to a small beach where we collected seaglass, shells and stones… and the plan to complete my box emerged. 

I embellished with bits of shells, and seaglass, embroidered starfish, seaweed, shells, sand dollars, and even a few waves.  Some shiny beads reflect the treasures found along the ocean shores after each high tide.  The lid sports a stylized version of the Golden Mean, in shells and seaglass.  “The Golden Mean is the desirable middle between two extremes, one of excess and the other of deficiency”, a fitting symbol for the pandemic.

I attached the lid with a loose cretan stitch, both inside and out, to enable it to sit open if needed.  The inside is embellished with embroidered sea grasses and weeds. 

All in all, this was an interesting project with good learning along the way, and a tangible memory of both challenging and lovely times. 

Suz – My sewing box is finally finished. Yay! I decided to add a trim around the outside, and found the perfect green trim in one of my stash boxes. I think it frames the Celtic designs beautifully. It also shows that I have (ahem!) a slight problem with centering………..so I have a quirky sewing box. I’m a little quirky, so we go together. lol

I thought I would show you how it looks inside, too.  The fabric for the inside of the box is a wonderful batik I love. I’ve been saving it for a special project, and there was just enough to also make the mini pincushion and two small needlecases. Just scraps left over. whew! Maybe it seems funny to use such a luscious fabric for inside a box, but, since I plan to use this as my sewing box, I know I’ll be seeing it often.
 
I added a strip of fabric ribbon to each inner side of the box to hold items, such as needle packets, fabric pens, and my scissors. The ones on the bottom of the box could hold skeins of thread or containers of beads. A bit of the fabric scraps were transformed into a triangular pocket to house the scissor’s blades and will hopefully protect against accidental punctures.
 
To show off the pin cushion, I used a few special pins sent to me by a lovely friend. The cushion is stuffed with batting and a fabric pouch filled with emery. I’m looking forward to using my sewing box!

Tina – This is the first Embroidered Box I ever made.  A challenging project for me, and in particular, with the sewing of the sides together.  I used the “Mary Sleigh” stitch for that portion of the project. 

I used linen for the outside of the box embellished with surface embroidery.  The surface embroidery is from a mini embroidery pattern series called Bitty Blooms from the Art of Home site by Jacquelynne Steves.

The inside of the box is made with Dupioni with the inside top using a combination of the linen and the Dupioni.  I made a small “oopsy” and didn’t make the linen square large enough.  So, I added a border of Dupioni.  It all worked out since the Dupioni is on the inside of the box anyway.  You would almost think I planned it that way!  And now – on to the next project ….

Mary Anne – With family roots in Zimbabwe my project became a Zimbabwe Box.   Before getting started the question of what to put in this box came up several times a week but after the tidying up of my husband’s sock drawer which produced sentimental WW2 memorabilia, coins, stamps and a small brass Zimbabwe bird ornament, suddenly I had the answer. 

This symbolic bird, together with a scrap of wallpaper,  became the focus and gave me the colour palette.    The design was stitched on to the lid on a natural linen background using cotton floss, perle cotton and beads and framed in a teal-coloured linen.  A handmade cord is attached around the lid and the lining is a plain teal cotton.    I buried a small magnet in the tab behind an orphaned earring and it keeps the lid firmly down by another magnet stitched in between the lining and the front panel. 

Now, what to do with the “Stuff”.  I made a coin purse, a mini stamp album, a concertina book of indigenous flowers and a pouch to hold the buttons and medals mounted on round cards.  I think it still has room to hold some old photographs so another mini-album is called for…… ooh and maybe a map!

Seanagh – I had a huge problem getting going on the 6” box … it felt so big, that all that would float through my head was the song “Little Boxes”, so instead of fighting it, I went with it.  You sort have to read the words – all about suburbia/repetition/sameness … and repeat.

As in the song, four colours, so each side was a different colour of houses.  I printed off suburban aerial views onto linen then applied the houses on top using organza and both machine and hand stitching. My initial idea was to embroider free standing houses (3-4) for each side, but when I got them on I didn’t like it, so went to the transparent(ish) look instead, with just one house.

Because I came out of it a bit frustrated that what I had was yet  another  box which had no specific purpose, but had some “treasures” that I wasn’t ready to throw out, I decided to make them their own box and use the big one to store them in.   So that’s how I ended up with a box to house my fragile Luna moth that either needed to be cared for or thrown out, and ditto with the crazy little ?fish bone that I found on a beach.

Maggie – I had decided to keep the embroidery simple and selected a pattern I have had for years.  The birds are ones that I see around the house – chickadees, robins, cardinals orioles and bluebirds.  To finish it, I made a cord using the technique that Deb taught at one of our meetings. 

It is my first box and I have learned a fair bit about planning ahead.  And, as a person who starts many more projects than I finish, I am proud that this is done.

Norah – There is not a great deal of stitching in this project. The top is a cross stitch pattern I found in a shop while we were in Paris several years ago. The beading I completed on the inside of the lid reminds me of the rose window in Notre Dame. The rest is a set of paper cut outs I got in my Christmas stocking the year after our trip. They have been kicking around my studio with me wondering what I could do with them. The box just felt like I could use them and the stitching together. 

I figured the box would not be washed or sent to the cleaners, it is just going to sit on the shelf in my display case in the studio. So why not ?  I tried printing one of the pictures on fabric but they did show up well enough for me to embellish with stitching.

Carol – The background for my box is 100% forest green wool which was once a sweater and intended to be a Christmas stocking! The dark green seemed perfect to set off the bright coloured birds inspired by the work of Sue Spargo. The sunny flower on top is my own. 

The birds are cut from repurposed 100% wool and are embellished with these stitches: blanket, back stitch, outline, picot, drizzle, colonial knots, bullion knots, satin stitch, knotted stitch, straight stitch, running stitch and fly stitch. Threads used in the project include stranded cotton, perle cotton and wool. Flat beads appear at simple intersections of running stitch on the box bottom.

The box is lined with dark green taffeta. A covered button on the front with a simple black cord serve to securely close the lid.

Suzanne – This is my first embroidered box. At first, I was overwhelmed with the task, but with Norah’s help, I  proceeded to finish the project. It was a lot of fun! 

I chose linen from my stash for the outside of the box. The inside was lined with a quilting cotton in a similar colourway. I used a water soluble, self-adhesive stabilizer to transfer a crewel embroidery pattern onto the lid. I chose a new colour palette. Then I needed to change the actual type of stitches shown in the pattern. I was now working on much a smaller scale. Further, I used perle cotton and embroidery floss instead of wool. I embroidered the design on the sides with satin stitch. 

The self-adhesive stabilizer that I used was “Sticky Fabri-Solvy”. It is removed by warm water once the embroidery is finished. This posed a problem in that the orange dye from the embroidery floss bled onto the linen. Another issue was that the linen shrunk, and the weave of the lid became noticeably tighter than the weave of the linen on the sides. 

Marilyn B. –  I have finally finished 2 boxes. The blue one has a scene that was embroidered. Since that took so long, I finished both boxes with beaded snowflakes. All the snowflakes are different. I added a magnet to the teal box. This will make it easier for my granddaughter to open and close.

Wenda – I have a book called Manipulating Fabric  and looking through it I was inspired by the chapter on tucks….so this is my Tuck Box.  Each panel is a different type of tuck.  It was a fun but complicated process.  The Venetian candies represent tuck, remember going to Tuck Shop at camp?