On Display

The Fibre Arts Festival and Sale 2024 - Peterborough will be held on Saturday, April 13, 2024, at the Peterborough Sport and Wellness Centre.  Please visit  Fibre Fest and Sale 2024 for more information on this upcoming event.  We were at the Peterborough Square on May 13, 2023. Please see here for more information on this successful event: Fibre Arts Festival and Sale 2023

Embroidered Postcards 2021

Thank you very much to Deb for leading us on how to make embroidered postcards.  The links here: Embroidered Postcard Instructions contains Deb’s detailed instructions.  This programme will run from February through to May.

Like the Embroidered Boxes programme, some of the members have experience in making postcards.  However, there are several of our members who have limited, or non-existent, experience.  Below are pictures of completed postcards, along with stories from the creators.  

February - Original Photograph from Jan - Nova Scotia Harbour - This picture is from our quarantine-vacation in Nova Scotia over Christmas 2020, the view from our AirBnb. I chose it as it offers so many different options to work with. I hope you enjoy it!
Suz's Interpretation

Suz – I did a lot of needle felting of pieces of felt, fabric and wool together, then I used straight stitches to anchor the buildings and to create movement in the water, plus to anchor the grasses. The grass stems are straight stitch with either french knots or bullion stitches to indicate the seeds. French knots and bullion knots were used to create the pebbles on the ground, although they may not be very visible due to the colours used. I wanted to keep them subtle so they didn’t compete with the grasses, but add texture and depth. Some of the longest grasses have a straight stitch across the stem to hold them in place. More straight stitch was used to create the far shoreline, to add shadow to the rocks, to seat the rocks into the water, as well as to add shadow at the base of the land rocks. Stab stitches were used to create shape and texture in the large rocks. I zig-zagged around the outside.

Norah's Interpretation - Here is my interpretation of Jan’s picture. It is a photo print that I enhanced with embroidery and some paint. I made the red and white cord.
Norah's Explanation of her Interpretation on the back of the postcard. The stamp is a print of a 1929 stamp.
Fiona's Interpretation


Fiona – I combined this challenge with a colour challenge for another group. Chose 6 colours (though I cheated and used variegated Valdani) from the picture and then did it on faded denim.

The backing is just cotton fused to the embroidered denim so it’s not very rigid. It’s called “All you can see is the sea”, as the blue sea rather predominates.

Wenda's Interpretation
Wenda's Interpretation - Back of Postcard

Wenda – The background was done on my embellishing machine which, I had to dust off before using!  I pounded two layers of organza in a horizontal direction for the sea with a piece of black upholstery felt for the backing.  The rocks were done with four layers of organza, using a circular motion. Then it was lots of little straight stitches and colonial knots.

Tina's Interpretation - Printed on a Fabric Sheet and then embellished with surface embroidery.
Tina's Interpretation - Back of Postcard - Postcard Template affixed to a piece of wool felt.
Jan's Interpretation
Jan's Interpretation - Back of Postcard

Jan – I was entranced by the pattern of the worn paint on the upside down row boat, and how the colours of the boat changed through the various light levels. I used handmade felt as my background, and fused fabrics onto a muted underlay, cutting out the grain pattern from the outer layer of fabric…..  it sort of looks like the worn paint did up close!  I used a darker fabric for the side, and covered all but the end with tulle to suggest lower light levels and shade.   The rocks are 3d, needle felted in wool, and the grasses embroidered.  Finally I couched a meandering thread to represent the sand and pebbles underfoot.

Suzanne's Interpretation


Suzanne – At first glance, my eye was drawn to the white church in the background.  I fused fabric to a piece of Decor Bond by Pellon for the church and the background.  Then I embellished with simple embroidery stitches.  For the water ripples I used my sewing machine to free motion embroider.

Seanagh's Interpretation
Seanagh's Interpretation - Back of Postcard

Seanagh – The picture is worked  on a rough spun cotton, painted first, some definition put in with fine marker and then stitched  in straight stitch only, using a single thread of floss.  The back is just hand drawn on card stock, and as I liked the Louisburg stamp that I found, I figured I would take a dream visit there too!

Maggie's Interpretation
Maggie's Interpretation - Back of Postcard

Maggie – I used burlap from a bag of rice and old tapestry yarn. For the grasses, I used a lot of Cretan stitch because I liked the loopy effect.  Interspersed was straight stitch and some lighter weight DMC.  The bottom half was seed stitched in several different colours. 

The back of the postcard was just muslin inscribed with a thin sharpie and a red pen for the stamp. Between the 2 layers was a stiff piece of Pellon. I loosened the tension on my serger and stitched around the card twice to give it the effect I wanted. 

Carol's Interpretation


Carol – Seaside Village: I was sure I couldn’t do water so I concentrated on the shore and a section of the little village. I saw the church with its tall spire as a beacon for fishing boats returning to a rocky shore. I relied on a “paint-and-stitch” technique before embellishing parts of the scene with stranded cotton threads.

Linda's Interpretation


Linda – This postcard has a painted background.  Free motion stitching around the rocks and water.  Used pieces of rock to embellish and used the turkey stitch to indicate grass. Added texture to the water with stem stitch.

March - Original Photograph from Suz - Hollyhocks - Eons ago, I would book one week of my holidays to take a watercolour painting class near Thornbury, Ontario with the Blue Mountain School of Landscape Painters. Each day, we would travel to private homes in the area to choose sites for our paintings. This is one such location. I like all the different textures, the colour contrasts, and the shadows..
Jan's Interpretation
Jan's Interpretation - Back of Postcard

Jan – My postcard is 3 dimensional with softly felted blossoms and leaves, and needle felted buds. The window is a shiny fabric (lining) outlined in back stitch.  The yarn is a cast off from a friend’s weaving warp!  The linen background is upcycled from an old napkin I think.

Carol's Interpretation


Carol – The stem, flowers and buds were first painted with a light touch of acrylic paint and then stitched with 3 shades of pink, and two of green, stranded cotton. The background is a small swatch of cotton coloured with water-soluble wax pastels done in an EGP workshop a few years ago.

Suzanne's Interpretation


Suzanne – I wanted to show the texture of the photo background on my postcard.  To do this, I overlapped and fused various small pieces of white fabric.  I was drawn to the flowers themselves and therefore decided to do a close-up view.    The flowers were cut from batik and hand-dyed fabric.  I fused the flowers and the leaves to the background and then embellished with beads and embroidery floss. 

Wenda's Interpretation
Wenda's Interpretation - Back of Postcard

Wenda – My version was to use the pulled thread technique for the slightly wonky block work in the background on some linen that a friend gave me.  Then I dove into my silk ribbon stash to create some three dimensional hollyhocks….felt good to make use of that almost forgotten treasure!  

Cynthia's Interpretation
Cynthia's Interpretation - Back of Postcard

Cynthia – My first made postcard. I kept it simple and not much embroidery on it. Found the ready made ribbon flowers in my stash to use for the hollyhocks.

Norah's Interpretation
Norah's Interpretation - Back of Postcard

Norah – This is painted with watercolour and then embellished with stitching and a few beads and then the charm of the bee was glued on.

Maggie's Interpretation - I spent a lot more time on this than I expected and continue to learn that I need to plan ahead. I am using the materials I have available including some old thin crochet cotton from my grandmother.
Maggie's Interpretation - Back of Postcard
Suz's Interpretation


Suz – I was enticed by the different textures in the photo, and wanted to try to capture them. However, once I added the leaves and flowers, all the wonderful texture disappeared. I decided to remove the hollyhocks, leaving the stems to add a vertical element. I like how the textures now peek through the stems.

Tina's Interpretation - Printed on a Fabric Sheet and then embellished with Fabric Markers, Outline and Stem Stitch, Felted Wool and French Knots.
Tina's Interpretation - Back of Postcard
Linda's Interpretation
Linda's Interpretation - Back of Postcard

Linda – This postcard was made with linen.  I used water colour pencils for the background.  Colonial knots, detached buttonhole, chain and stem stitches were used.  I am pretending to send the card to my grandmother who planted the flowers every year.

Fiona's Interpretation
Fiona's Interpretation - Back of Postcard
Marilyn W's Interpretation
Marilyn W's Interpretation - Back of Postcard
Marilyn B's Interpretation


Marilyn B – This is done on raw silk. I painted the window as well as some spots to indicate stucco. Being a relative newcomer to embroidery, I decided to use the stem stitch for the stems, French knots for the top of the plants and my version of the Pekingese stitch for the window panes. I did not finish the reverse side.

Deb's Interpretation
Deb's Interpretation - Back of Postcard

Deb – The inspiration for this was an incident 20 years ago, when someone in my house got a new hedge trimmer…the year when EVERYTHING in the garden was levelled to 5’ 10”.  I’ll look at this and remember what could have been…  

Technique: Background of raw-edge cotton strips with running stitch; appliquéd cotton leaves and flowers, Romanian couching, detached chain, with French and colonial knot accents. Supported by Pellon interfacing and cotton backing. 

Seanagh's Interpretation - The card is worked in machine embroidery with a little bit of ink pen on the window and wall.
Seanagh's Interpretation - Back of Postcard
April - Original Photograph from Norah -Chinese Garden Moon Gate - This was taken in the city of Vancouver BC, in ChinaTown. There you will find Dr. Sun Yat-Sen traditional Chinese Garden. It is one of the nicest gardens I have ever been in. You will find it very peaceful and quiet even though it is one of the busiest parts of the city. This is a Moon Gate and it is set so that when the moon is just off the horizon: the gate frames it.
Norah's Interpretation
Norah's Interpretation - Back of Postcard
Maggie's Interpretation
Maggie's Interpretation - Back of Postcard

Maggie – I stem stitched the outlines with Valdani thread and then I admit that I used left over fabric paint from when my kids were little to fill it in.  I tried stitching it but it became overwhelming.  The fabric is scraps of linen/cotton blend left over from pillows I made a few years ago.

Deb's Interpretation
Deb's Interpretation - Back of Postcard

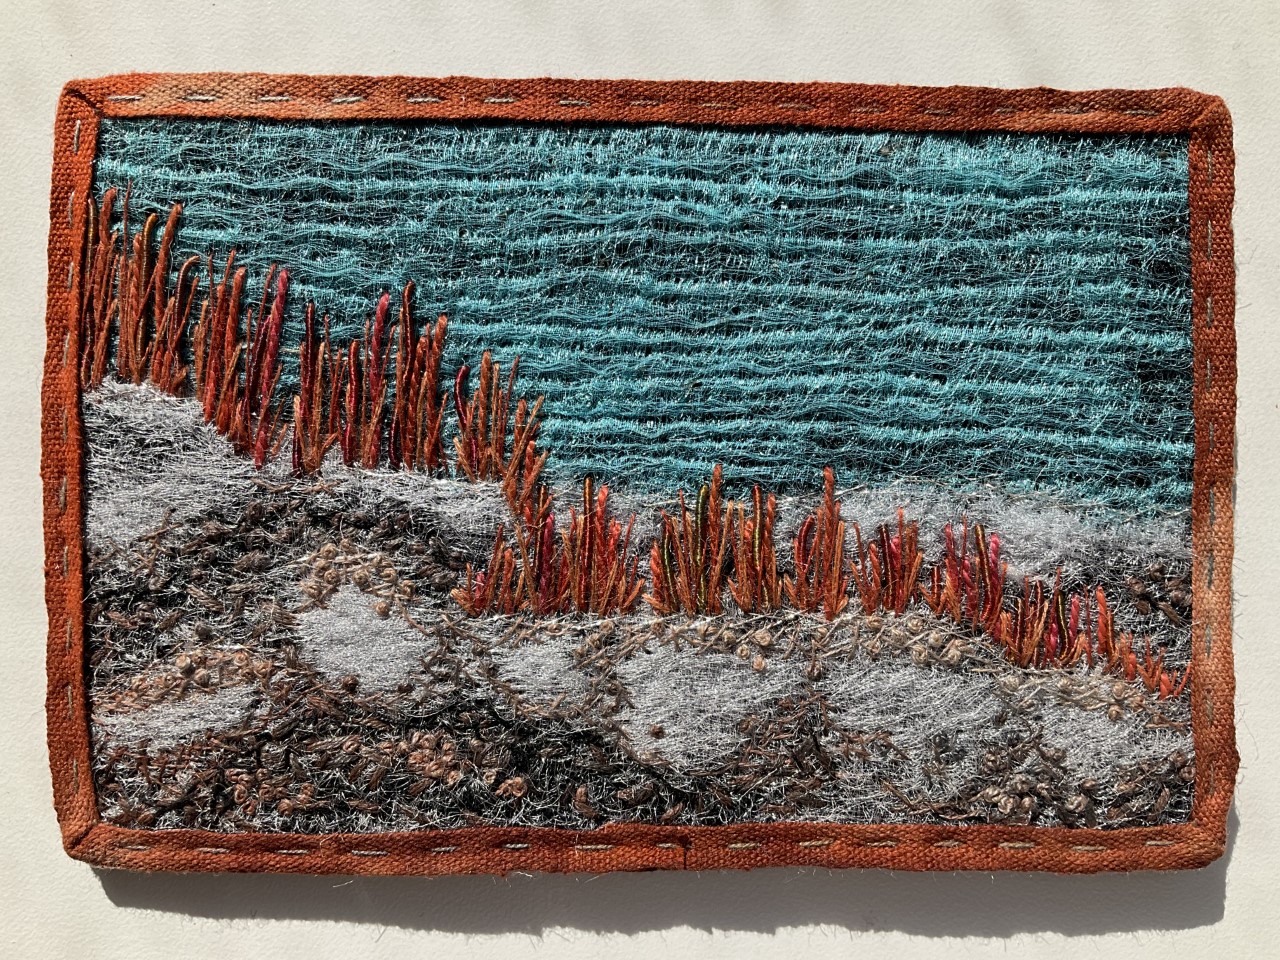
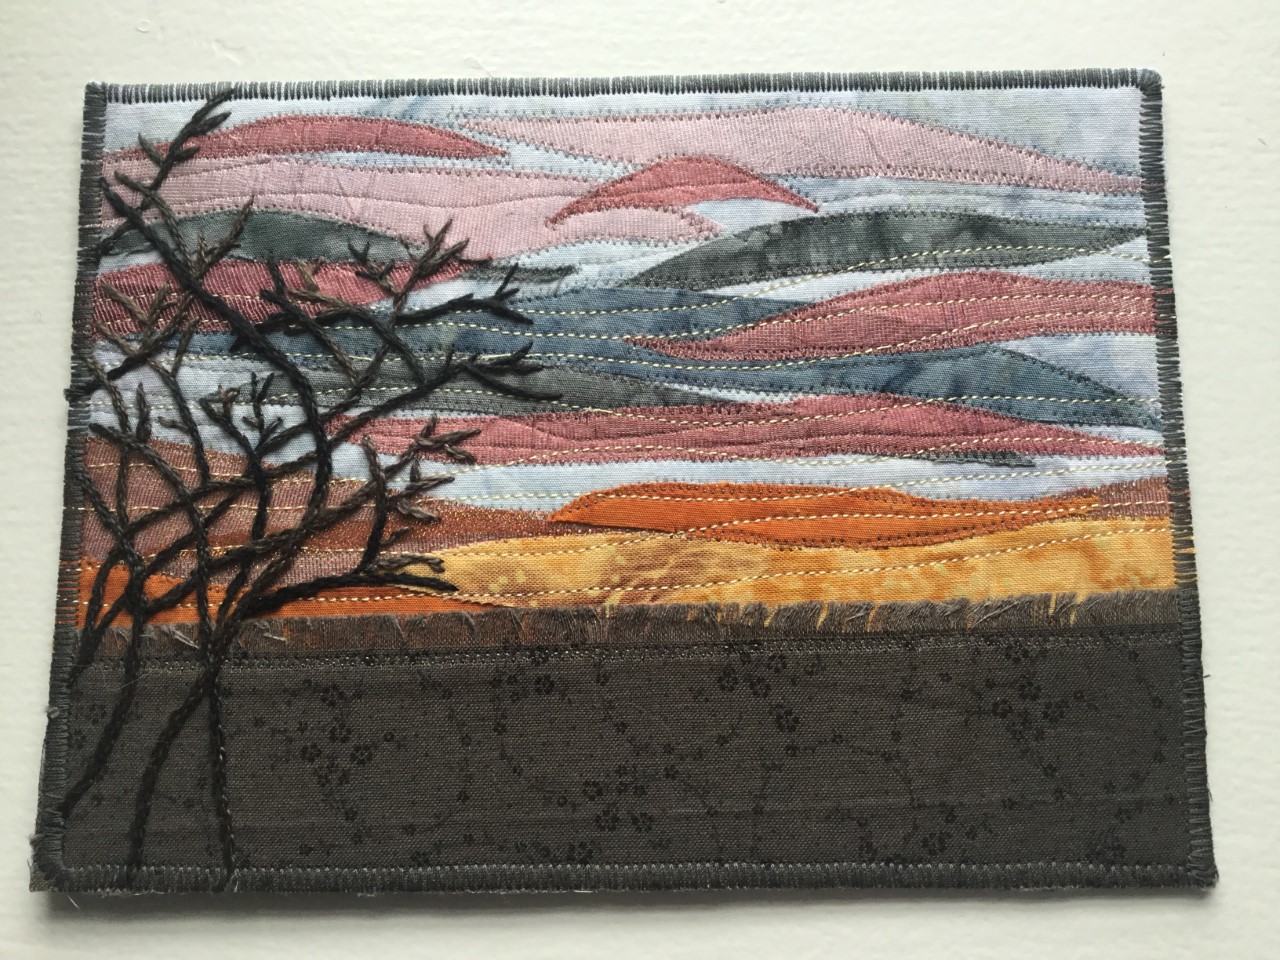
Deb – Our inspiration for April perfectly lined up with the excitement around seeing the pink supermoon, which was named for the phlox that was, I guess, blooming in someone’s garden at the same time…hmmm…As it turned out, NOT in my neck of the woods!  And I missed seeing the moon because it was, yet again, cold and cloudy…

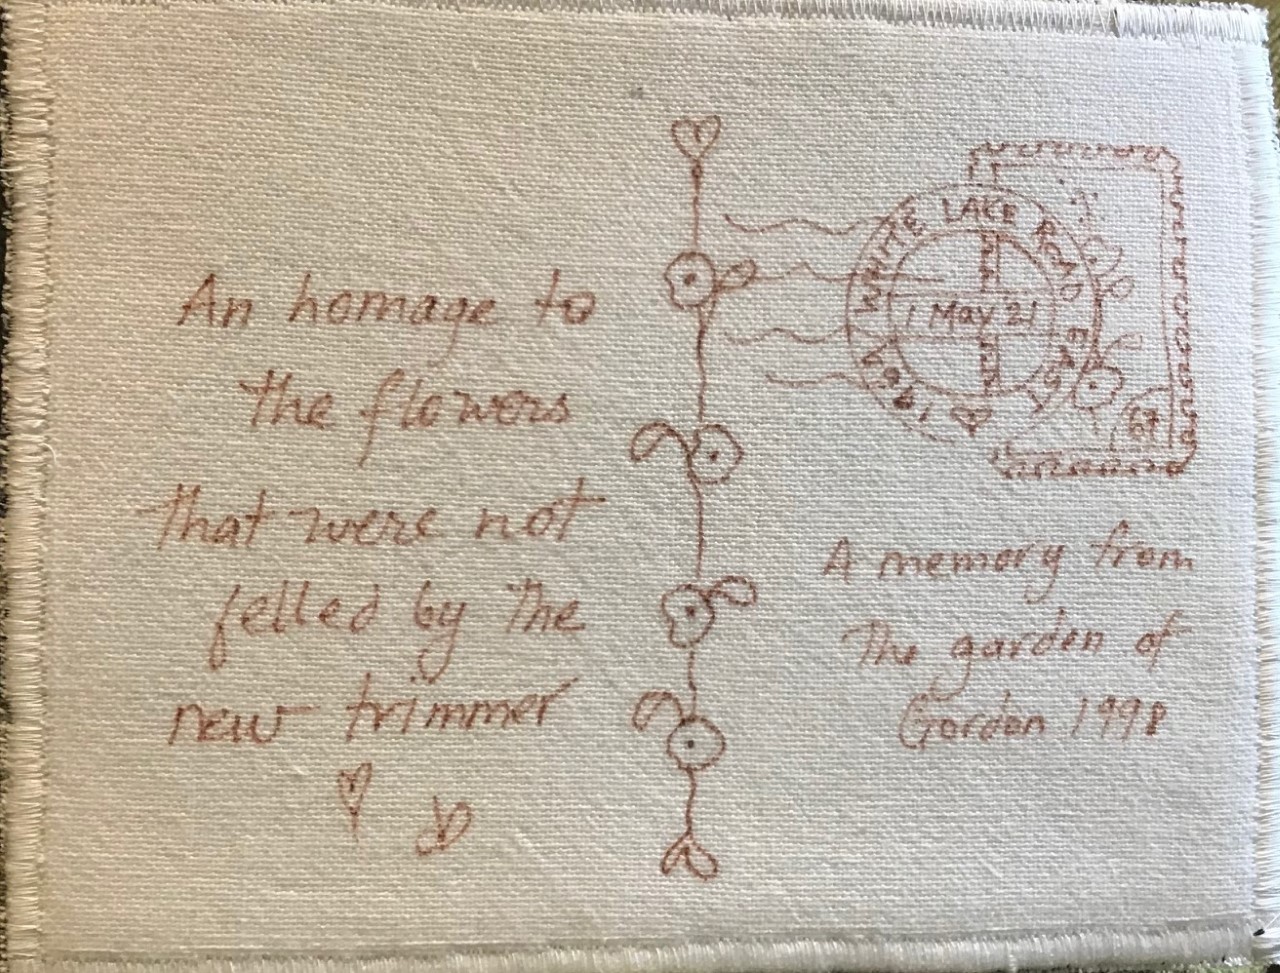
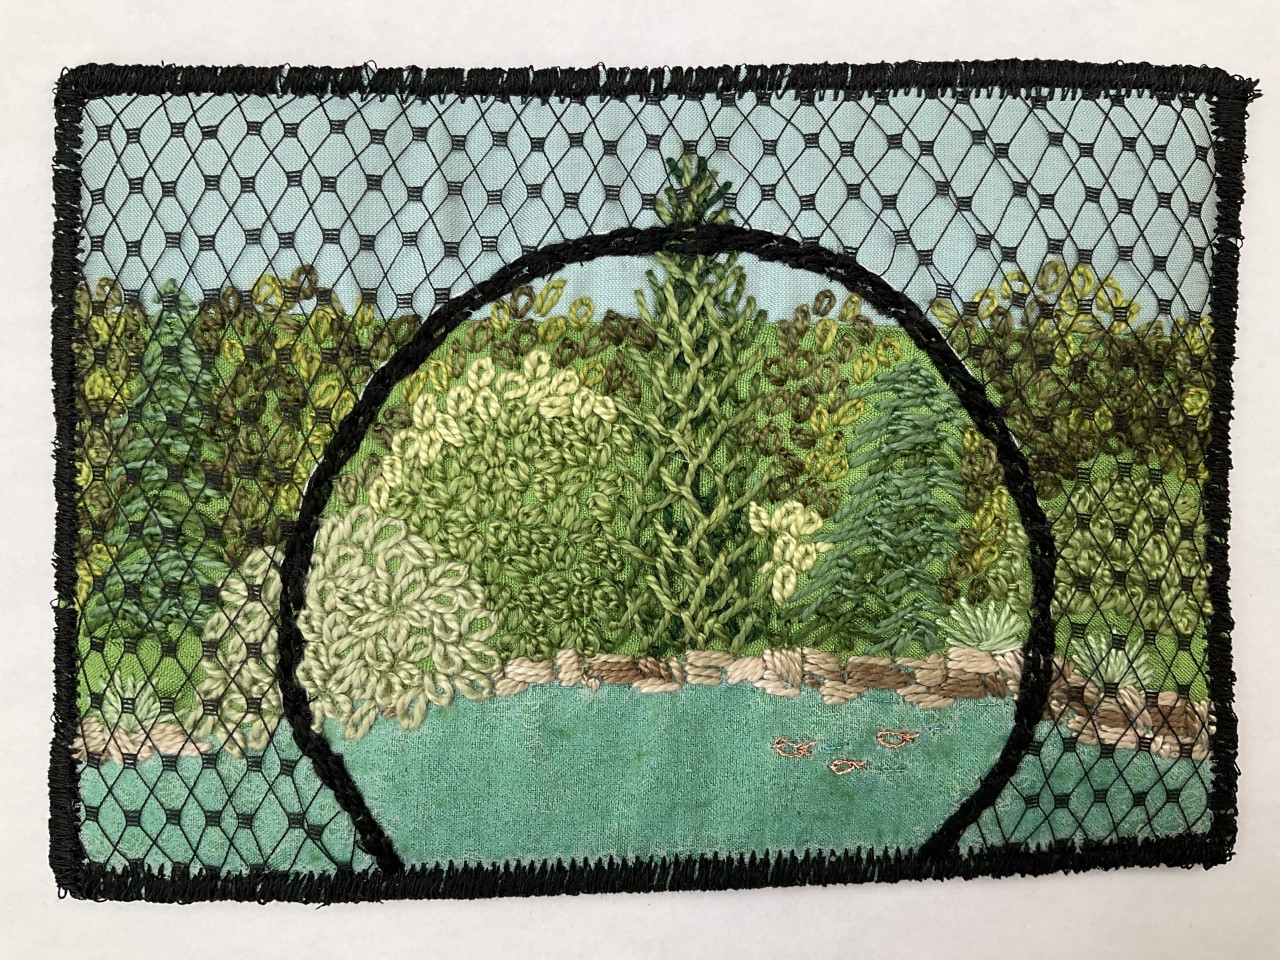
Wool felt ‘phlox flowers’ stitched on a ground of brown linen with really haphazard kloster blocks to represent that beautiful moon gate…my sincerest apologies to Mary Anne, who taught me how to do a proper kloster…but this exercise was a good reminder of why I gave up hardanger embroidery for good…

Suz's Interpretation


Suz – I used white muslin on black felt for the fabric, then used fabric paints, fabric felt pens, and gel pens to create the picture. The gate was created by couching black gimp in a vermicelli lace pattern for the grillwork.

Fiona's Interpretation
Fiona's Interpretation - Back of Postcard with Technique Explanation
Suzanne's Interpretation


Suzanne – The gate inspired me to try my hand at Blackwork, which I found to be quite meditative.  In order to make a decision about the centre of the blackwork frame, I researched the kinds of flowers that are typically found in Chinese gardens.  The peony,  one of my favourite perennials, is also  a popular garden flower in China.  The technique that I used for the flower was raw-edge applique.

Carol's Interpretation

Carol – This piece is done with water-soluble wax pastels on a white cotton background. A piece of window screening serves as the gate. The painted boat is outlined with backstitch and the characters in the boat are embroidered.

The inspiration for the scene is from Makeda’s 9-yr old drawing when EGP members were involved in stitching the French Lifeboat badges. Further inspiration is from Charlotte Gray’s biography of Pauline Johnson who was born in 1860 near Brantford, ON to a Mohawk Chief and an English gentlewomen. Pauline was a published author, poet, actress, activist and much more. Pauline’s main means of travel was by CANOE on the Grand River.

Wenda's Interpretation


Wenda – The greenery was fun to do…lots of lazy daisies, but then came the gate.  My original plan totally flopped so I thought I would use some black lace but it totally obscured my background stitching.  Then I found this veil netting which I doubled and unfortunately moved a bit in the end….oh well, on to the next.

Linda's Interpretation
Linda's Interpretation - Back of Postcard
Seanagh's Interpretation
Seanagh's Interpretation - Back of Postcard

Seanagh – I laid down a bunch of mostly transparent fabrics and stitched the foliage texture over them in floss and silk threads.  The actual gate was made by zigzagging the angular design onto Pellon and then cutting it out and applying it over the top.  I did think of doing it in cutwork and then I thought again!!

May - Original Photograph from Marilyn - Backyard Sunset - I took the picture with my iPad last December in our back yard. It was a wonderful, colourful sunset. I went through hundreds of vacation photos but came back to the back yard!
Linda's Interpretation - I used colour blocking system with stem, fly and detached chain stitches.
Linda's Interpretation - Back of Postcard
Carol's Interpretation


Carol –  The colours in Marilyn’s spectacular sky scene made me think of fall so I stitched some Canada Geese on their way south. The background of this postcard is white cotton coloured with water-soluble wax pastels. The Canada Geese are stitched with 3 strands of black DMC stranded cotton.

Maggie's Interpretation
Maggie's Interpretation - Back of Postcard
Fiona's Interpretation
Fiona's Interpretation - Back of Postcard
Wenda's Interpretation


Wenda – Shocking, yes, I did pastels!  I cut strips of organza and frayed their edges then, simply held them down with running stitch.  I attempted to get an airy feel to the piece. 

Jan's Interpretation

Jan – I tried a number of approaches, starting with Aquarell pencils (too washed out), then snippets of organza under netting (inspid), then layered on my version of random stitching.  It was interesting being able to adapt the shading and tones of each block of colour by adding more of one or another colour.  BUT very time consuming.  I added the tree in the foreground in a muted purple as it seems that dark shades often appear that interesting colour at sundown. 

Deb's Interpretation
Deb's Interpretation - Back of Postcard
Deb – Here’s my sunset, inspired by Marilyn’s photo but based on a sunset over our lake last year.  The depth of the colour is what I used as a stepping-off point.  That old sailing adage also came into the mix…mainly because I have an old sailor in my house…😉
 
The technique is also inspired by the full colour, painterly style of Sue Dove, done on needlepoint canvas with full strands of DMC threads, using for the most part a loose outline stitch.
Seanagh's Interpretation
Seanagh's Interpretation - Back of Postcard

Seanagh – I thought this one would be so easy … gorgeous colours, etc.  Well I couldn’t get to first base with it! I eventually made a print and in desperation started tearing it into strips — voila! My postcard.  Paper torn and re-aligned then stitched with some silk threads  for a shiny sun just setting.

Suz's Interpretation


Suz – Created on a felt background, I added strips of fabric for the sky colours, using buttonhole stitch to anchor them. Black gimp strips turned into the tree trunk and branches, and embroidery floss was used for the leaves and a few grasses.